Homemade Yogurt Continued…

So I had some people ask me if what I made the day before was thick and creamy like Greek yogurt and my answer was no. In order to have thick Greek yogurt, you need to strain it. To do this you just take a mesh strainer and lay either cheese cloth, coffee filters or a paper towel in it and then dump your yogurt on top and let it sit overnight in the fridge.

I happened to have an actual yogurt strainer in my cupboard of appliances….along with an actual yogurt maker.

Just place the strainer in the container and then dump the yogurt in the strainer.

Cover and put in the fridge overnight.

This is what I had in the morning. Greek yogurt on the left and whey on the right. As you might be able to see, there is a little bit of yogurt in the whey, so maybe a coffee filter would be a little better with the strainer than just the strainer alone. I have no idea. I’ve never done this before.

There is the yogurt. I ran my finger through it to see how thick it is.

Here is a comparison between the strained yogurt (on top) and then regular yogurt straight out of the crock pot (on bottom)

Yumm!! Apparently, if you keep letting the yogurt strain you will get cream cheese. Will have to test this some time….

So here is the whey. So I looked online to see what to do with this other than put it in smoothies. One of the things I found was to use it in making bread instead of whatever liquid is in the recipe. So now I have whole wheat herbed pizza dough rising downstairs. As always, a recipe will follow 🙂


Added:

If you are looking for the nutritional information of the liquid whey, well you have come to the right place since I looked to the end of the interwebz to find this info:

Serving size: 1 cup

Calories: 59

Fat: 0.2 g

Carbs: 12.6 g

Protein: 1.9 g

This is what is dripping out of your yogurt (or settling on top if you aren’t straining it on purpose).


Now you can use this to calculate nutritional info for stuff when you sub in liquid whey for other things.

Homemade Yogurt

I was always against plain yogurt. Gross. I tried everything to sweeten it from honey to sugar free Torani syrups to stevia drops. I never liked it. Then I started adding a teaspoon of homemade jam to it and then I actually started liking it. Now I’m at the point where I can just eat it plain and eat a lot of it. At Costco I think I pay about $5.99 for a quart of Fage Greek yogurt and I easily eat it within the week. My mom has always bugged me about making my own but it’s always scared me. I’ve randomly googled how to make it in a crockpot since I “overheard” on facebook that you could make it that way but I was still to scared. Once I realized that even if it was a flop, I only wasted about $2, I decided to take the plunge and I’m glad I did! I’ve made it twice now, the first time was a total failure but I figured out what my mistake was and the second time was a total success. I’ll share both things with you so hopefully you can get it right the first time!

So on clearance I found a half gallon of organic milk for $2.99 and 1 cup of organic plain yogurt for $0.49. This will make a half gallon of organic yogurt for $3.48 compared to $3.99 for a quart of organic (so x2 would be $7.98 for a half gallon for a savings of $4.50).

First, get out your crock pot and turn it on low and put the lid on so the stone can warm up. It takes about 30 minutes but it will also take about 30 minutes for the milk to be ready to put in it.

Next, pour however much milk you want to make into yogurt into a saucepan and warm it on medium (stirring frequently so it doesn’t burn) until the temperature reaches 185 degrees F. I just used a digital meat thermometer but word on the street is that you can get candy thermometers for less than $10.

While the milk is warming on the stove, take 1/4 cup of already made yogurt per every quart of milk you are making into yogurt and put it in a medium bowl. It’s best to let this warm up a bit so it doesn’t cool the milk down in the second to last step. So I’m making a half gallon so I used 1/2 cup of yogurt for the 1/2 gallon (2 quarts) of milk. Tip: After this batch is done and you are putting it into containers, save however much yogurt you need for the next batch from the batch you just made.

Once the milk in the pan reaches 185 degrees F, turn the stove off, remove pot from burner, cover and place the pot in a few inches of cool water (I just fill my sink up a little). This is where I screwed up the first time. Let the milk cool from 185 degrees down to 115 degrees. First time I let it cool down to 90 because I wasn’t paying attention and the blog I was following said between 90-110 and it would take about 10 minutes. Well after about 5 minutes it cooled way down. The second time I only let it cool to 115 and my yogurt came out perfectly.
After yogurt has cooled to 115, take 1 cup of the warm milk and whisk it with the yogurt in the medium bowl. Take the rest of the milk and pour it into your crockpot. Immediately turn off and unplug your crock pot and remove the stone. Then add the milk and yogurt mixture to the rest of the milk in the crockpot. Whisk together briefly.

Now there are two options of what to do with your crockpot for the next 8-12 hours. I do this at night so it’s ready in the morning. Some just wrap the crockpot in a heavy towel or blanket to keep warm (did this the first time and it wasn’t very warm in the morning) or you can put your crockpot in a TURNED OFF oven with the oven light on. I chose to do that the second time.

Shut the door and leave the light on all night. It needs to be about 70 degrees in your house for this to really stay warm, if it’s colder than that (like our house now), leave it in the oven.

So the next morning this is what I woke up to:

And I ran a spoon through it so you could see how thick it is:

I then put the whole crockpot in the fridge to cool and to thicken more (which is thickened up a little bit more after cooling).

Then I stored in mason jars, since we all know I have about 10 million of these 🙂

I’ll eat the two quarts within the week with pumpkin spice granola (recipe to come) and then the little pint is enough to start my next batch! Perfect! Saved $4.50 a week so that’s $18 a month and on top of that I now have organic yogurt!

Note added: If you want it real thick, like Greek yogurt, you need to strain it as it sits in the fridge. So take some cheesecloth, coffee filters or a paper towel and line a mesh strainer and dump the yogurt into the strainer and put something like a large bowl under it so the liquid (the whey) can drip down. You can either discard the whey or you can drink it or add it to smoothies since it’s good for your digestive system.


Continue HERE if you want to see how to make Greek yogurt now

Tomato Paste

I get really frustrated when a recipe calls for 1 or 2 Tbsp’s of tomato paste. That means I have to open up one of those tiny cans, use half of it, put the other half in the fridge, completely forget about it and let it get moldy. Well not anymore!!

I have about 60 of these little cubes from making the boys baby food but they are pretty much pointless for my boys because their first meal is the equivalent to a trucker’s special at Denny’s. I don’t think either boy has eaten just 2 Tbsp’s of food before. So these little things I got when I lived in Montreal and I got 5 dozen of them for like $3 a set and they have a nice little tray that they stack in and then they stack on top of each other. They hold 2 Tbsp’s so it’s perfect. I just fill them up and put them in the freezer door until the next annoying recipe calls for half a can 🙂


Another tip with tomato paste is getting it out of the can easily. If you look at the top and the bottom lip, they both indent inwards, where as a Campbell’s soup can the top dents in and the bottom puffs out so you can only open it from the top with a can opener. Well! On a tomato paste can, you can use a can opener on BOTH sides and then push one lid through the can and it pushes all the paste out nicely. Want another little tidbit? Refried bean cans are designed the same way 🙂

Happy can opening 🙂

Sugar Free Maple Syrup

So I’ve made it pretty well known I’m a hater of just about all the low calorie (natural and artificial) sweeteners. But one thing I love it sugar free maple syrup and until I took this photo, I had no idea it was made with Splenda, which I try to keep that to a minimum (or not have it at all). Grrrr….I’ve heard that Mrs. Butterworth’s has a good sugar free syrup and it’s pretty thick like normal maple syrup. If I spot it at the store this week, I’ll pick it up and try it out…and I’ll ask her what the sweetener is 🙂

I use it on protein pancakes and in my oatmeal sometimes, well most of the time! It has 10 cals less per serving of my homemade blueberry lemon syrup that I can during the summer. But let’s be honest, I don’t use 1/4 cup of syrup on any thing! That’s a lot!!


Egg Whites

There are a couple of ways you can get egg whites.

Fresh eggs I buy at Costco for $7 and some change for 5 dozen, which is usually what we (well …me!) go through in 1 week. How do you get the yolk from the white without a huge mess or the yolk breaking?

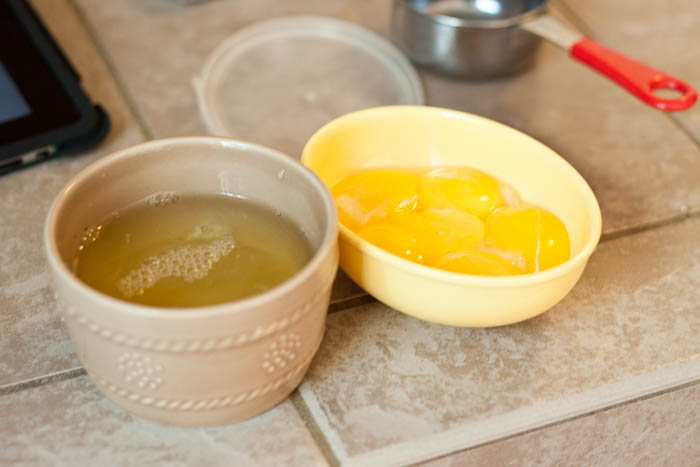
This sweet little thing my mom got me a couple of years ago. What to do with the yolks? Well, yolks have 5 grams of fat, all of an egg’s vitamin A, D, and E; almost all the vitamin B12, choline, folic acid and vitamin B3. Good for the developing brain. So I keep them and my kids pretty much have strictly scrabbled yolks and I usually do a 4 whites to 1 whole egg ratio for scrambles. Babies can have yolks starting at 8 months old but they cannot have the whites until 1 year old. Egg whites are one of the top 8 children allergens. So I have perfect live egg yolk disposals 🙂 They will generally get 4 yolks and a whole egg, or just yolks.

Egg whites in a carton that you can get at your local grocery store you need to be careful with because they aren’t necessarily 100% whites. I have had this problem before. They are colored and flavored and work just fine if you are making an omelet. But if you are going to bake with them, it’s gross because they have garlic and/or onion powder in it 😦 Fresh egg whites are colorless, odorless and virtually tasteless, so you can actually eat them sweet with some berries. I prefer straight up fresh egg whites. You CAN buy 100% in a carton at the store, just make sure you read the ingredients.

Egg Whites International is a great option. It comes in pints, half gallon and whole gallon jugs with a pump that dispenses out egg whites. They keep forever in the fridge. Because I’m a math person by nature, I calculated if this would be more cost effective for me (and not to mention save us some room in the fridge) and it would cost $56 (plus shipping) for two gallons of egg whites (which is about 28 dozen eggs) and it would cost $40.60 for 28 dozen eggs if buying in a 5 dozen flat. Maybe some day I’ll order from them to free up space in the fridge, but right now it’s more cost effective to just buy eggs and put in the time to separate the egg.

Local & Organic Honey


Can I just brag about this sweeeeeeeet deal one of my friends got a bunch of us??? I want to say there was at least 10 gallons of this waiting for us at mom’s group on Tuesday. This is 1 gallon of unfiltered, unpasteurized, local & organic honey. You might want to sit down before I tell you how much I paid for this bad boy. If you went to a local farmers market and bought it little by little in a small bottle it would be about $100 by the end of the season. Originally, it was $40 for the gallon, I was game at that price but she ended up having so many people order it that we got it down to $30/gallon. Yes, $30 for the entire gallon of golden yummy goodness. For real.


If you are in the Vancouver area, I (obviously) didn’t block out the phone number, but this is where my friend got the honey from! Most likely will be going to get some more before summer is over 🙂

My ridiculous arsenal…

…of spices, herbs, flavorings, nuts (whole, chopped, meal, ect), oils, vinegars and baking ingredients. You can’t see back into the cabinet, but that bottom row is 4 rows deep of spices and herbs. All those plastic bags?? Welcome to your new best friend! BULK FOODS! On the shelf, in a pretty glass bottle is a $5-8 quarter cup of an herb or spice, go to a place that sells bulk foods and you pay maybe 50 cents! I bought all the glass spice containers that you see on the lower right from IKEA, it’s $4 I think for 5 containers. I printed out labels on the computer or hand wrote on them when I didn’t have time to print them. Not to mention the entire spice rack on the counter below the cabinet….I have issues or I absolutely hate having to run to the store for a teaspoon of something.

Maybe some day I’ll be brave enough to show my pantry shelf with all of the flours I buy that my husband doesn’t understand why I need ALL of them 🙂 Hey- at least my neighbors know who to text if they need a teaspoon of something 🙂

Attention Sweet Potato Haters!

I was once you…actually…a month ago I was you! Ask my mom, I wouldn’t come any where close to a sweet potato! But I decided to roast them with some spices because one night we went out to eat at a Brewery in downtown Portland and they had these awesome spicy paprika fries! So good! And a lot of people love sweet potato fries but don’t like sweet potatoes. So here is my spice line up:

Salt, pepper, olive oil, cajun spice, garlic powder and paprika

Peel and cut up however many sweet potatoes into about 1 to 1/2 inch chunks. I only use olive oil to get everything to stick to the potatoes. For three sweet potatoes I use about 1-2 TEASPOONS of olive oil, barely any at all. I wish I had measurements but I don’t so be brave and just start shaking stuff on there 🙂 I’d like them spicier but my little one loves these so much so I only put 2 shakes of cajun on there but feel free to go to town with the paprika!

Put it all in a bowl and toss with your hands or a spoon

Then dump ’em on a cookie sheet (I like to line with foil because I baby my bakeware) and roast at 425 for 25 minutes.

We have sweet potatoes every 3-4 nights and this is the only way I have yet to make them and there is never any leftover either 🙂

Laughing Cow Cheese

Chyeah! Honestly I thought these were 45 calories per wedge until I uploaded the photos into the side by side frame, score! They are 35! Even better! This is another mayo addicts alternative choice as well as an alternative for cheese.

I put this on toast and top it with two over easy eggs, sandwiches, wraps and in celery. I actually prefer this in celery instead of peanut butter. Weird because I love peanut butter! I know they come in other flavors but they aren’t light. I think light is just creamy swiss, I’ll lave to look around some more. I got a stack of 5 of these at….well…Costco, how’d you guess?? They also keep in the fridge FOREVER. I’ve bought these for a while but it’s not until recently that I started going through a package of them in a week.

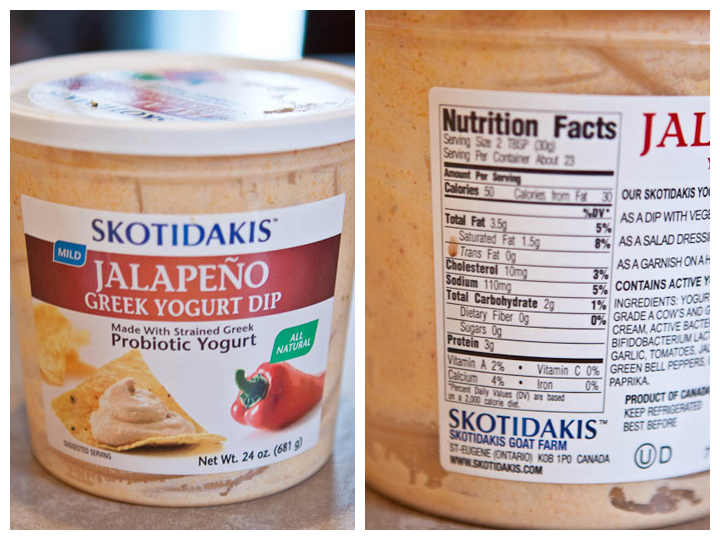
Jalapeno Greek Yogurt

If you are a mayo addict like myself, this is an AWESOME grab at Costco to ween you off your dependency on mayo, full fat sour cream dips and creamy dressings.

As you can see, my container is empty 😦 It is full fat greek yogurt, but it surely a WAY better choice than mayo! All of the ingredients are listed on the back and you can pronounce them and I have them all in my kitchen so I could go and make it with non-fat but it would take a lot of testing for me to get it right. I only use 1 or 2 Tbsp anyway. I use this for a veggie dip, on sandwiches, eggs, burgers, salads,  you name it. I eat the whole container in a week. You could also mix it with equal parts non fat Greek yogurt because the flavor is quite powerful. I might try that this week and get back to you on it.

**Edit** I’m not sure how I forgot this but I use this the most on hard boiled eggs, either with or without the yolks. If I’m feeling super crazy, I’ll whip up the yolks with some of this and make deviled eggs!